Screenshot Testing Push Notifications
At Twitter, we regularly use Paparazzi for our screenshot unit tests. We prefer this library over others because it runs on the JVM, which results in fast turnaround times.
Recently, I was working on changes to our push notification layout. As I was making modifications, I began to wonder if it would be possible to have JVM screenshot tests for the same. This would help ensure that our notification layout was displaying properly and consistently across different devices and OS versions.
Custom Notification Layout
Before diving into screenshot testing for notifications, let’s first understand why it’s necessary. Most apps use the default push notification templates, which don’t require screenshots as the operating system guarantees consistency. However, Android also allows us to provide our own notification layout if the default templates don’t meet our needs. At Twitter, we have make heavy use custom layouts as they allow us to present notifications in an appealing and effective way.
This blog post does not dive into the details of custom push notification layout. To learn more, have a look at the developer docs.
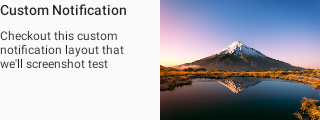
Assuming we have the following custom layout for notification:
1
2
3
4
5
6
7
8
9
10
11
12
13
14
15
16
17
18
19
20
21
22
23
24
25
26
27
28
29
30
31
32
33
34
35
36
37
38
39
40
41
42
<LinearLayout xmlns:android="<http://schemas.android.com/apk/res/android>"
    xmlns:tools="<http://schemas.android.com/tools>"
    android:layout_width="match_parent"
    android:layout_height="wrap_content"
    android:orientation="horizontal"
    android:weightSum="100">

    <LinearLayout
        android:layout_width="0dp"
        android:layout_height="match_parent"
        android:layout_weight="50"
        android:gravity="start"
        android:orientation="vertical">

        <TextView
            android:id="@+id/title"
            style="@style/TextAppearance.Compat.Notification.Title"
            android:layout_width="wrap_content"
            android:layout_height="wrap_content"
            android:ellipsize="end"
            android:maxLines="1"
            tools:text="Title of the notification" />

        <TextView
            android:id="@+id/text"
            style="@style/TextAppearance.Compat.Notification.Line2"
            android:layout_width="wrap_content"
            android:layout_height="wrap_content"
            android:layout_marginTop="8dp"
            android:layout_marginEnd="16dp"
            tools:text="Description of the notification" />

    </LinearLayout>

    <ImageView
        android:id="@+id/image"
        android:layout_width="0dp"
        android:layout_height="120dp"
        android:layout_weight="50"
        android:scaleType="centerCrop" />

</LinearLayout>
When set as a big content view notification layout:
1
2
3
4
5
6
7
8
9
10
11
12
13
14
15
16
17
fun NotificationCompat.Builder.setCustomNotification(
    context: Context,
    title: String,
    text: String,
    imageResource: Int
): NotificationCompat.Builder {
    // inflate the layout and set the values to our UI IDs
    val remoteViews = RemoteViews(context.packageName, R.layout.view_custom_image_notification)
    remoteViews.setImageViewResource(R.id.image, imageResource)
    remoteViews.setTextViewText(R.id.title, title)
    remoteViews.setTextViewText(R.id.text, text)

    setCustomBigContentView(remoteViews)
    setStyle(NotificationCompat.DecoratedCustomViewStyle())

    return this
}
it produces the following notification:

Screenshot Testing
To test the notification via screenshots, we need access to the final decorated notification layout. It is not enough to screenshot our layout file alone, as the Notification Actions are added via the notification builder.
To obtain the final notification layout, we must first access the posted notification. The NotificationManager allows us to do so via the getActiveNotifications() method. This returns a list of notifications posted by the calling app that have not been dismissed by the user, making it ideal for our test. After obtaining a list of active notifications, we can retrieve the Notification object and its bigContentView.
1
2
3
4
5
val notificationManager = context.getSystemService(NotificationManager::class.java)
val statusBarNotifications = notificationManager.activeNotifications
Assert.assertEquals(statusBarNotifications.size, 1)
val postedNotification = statusBarNotifications[0].notification
val remoteViewToTest = postedNotification.bigContentView
Once we have the RemoteView, we can call the apply method on the remote view to inflate it and get back a View, which we can snapshot. So our test will look as follows:
1
2
3
4
5
6
7
8
9
10
11
12
13
14
15
16
17
18
19
20
21
22
23
24
25
26
27
28
@get:Rule
val paparazzi = Paparazzi()

@Test
fun `Generate and Test Notification Screenshot`() {
    val context = paparazzi.context
    val postedNotification = postAndGetNotification()

    val remoteViewToTest = postedNotification.notification.bigContentView
    val view = remoteViewToTest.apply(
        context, FrameLayout(context)
    )
    paparazzi.snapshot(view)
}

private fun postAndGetNotification(): Notification {
    // Route that generates the notification and posts it to the OS
    val myAppNotificationGenerator = MyAppNotificationGenerator(....)
    // post the notification
    val payload = Payload(....)
    myAppNotificationGenerator.processPayload(payload)

    val notificationManager = context.getSystemService(NotificationManager::class.java)
    val statusBarNotifications = notificationManager.activeNotifications
    Assert.assertEquals(statusBarNotifications.size, 1)
    return statusBarNotifications[0].notification
}
But when we ran this, it failed with the following error:
1
2
3
4
Unsupported Service: notification
java.lang.AssertionError: Unsupported Service: notification
    at com.android.layoutlib.bridge.android.BridgeContext.getSystemService(BridgeContext.java:694)
Paparazzi utilizes Android Studio’s LayoutLib to render views, and the LayoutLib provides its shadows of some of the services of the Android framework. Unfortunately, LayoutLib - unlike Robolectric - doesn’t provide a shadow for NotificationService, resulting in the above error.
At this point, we could attempt to refactor our code to return the Notification object that we can directly use in testing, without having to go through the NotificationManager. However, this isn’t feasible for us since we’re using other components of the Android SDK to generate notifications. Thus, all our other unit tests that test Notifications also use Robolectric. Consequently, we need an alternative. That’s where Roborazzi comes to our rescue.
Roborazzi seamlessly integrates with Robolectric, enabling the ability to visualize views within the JVM. As a result, it offers a dependable screenshot testing process for environments requiring access to Robolectric.
To learn more about Roborazzi and how to integrate it in your project, check out the developer docs at: https://github.com/takahirom/roborazzi
We update our tests to use Roborazzi:
1
2
3
4
5
6
7
8
9
10
11
12
13
14
15
16
17
18
19
20
21
22
23
@get:Rule
// val paparazzi = Paparazzi()
val composeTestRule = createAndroidComposeRule<ComponentActivity>()

@get:Rule
val roborazziRule = RoborazziRule(
    composeRule = composeTestRule,
    captureRoot = composeTestRule.onRoot()
)

@Test
fun `Generate and Test Notification Screenshot`() {
    val context: Context = ApplicationProvider.getApplicationContext()
    val postedNotification = postAndGetNotification()

    val remoteViewToTest = postedNotification.notification.bigContentView
    val view = remoteViewToTest.apply(
        context, FrameLayout(context)
    )

    // paparazzi.snapshot(view)
    composeTestRule.setContent { AndroidView(factory = { view }) }
}
Using Compose-View interop, we can render our remote view by enclosing it in an AndroidView composable and setting it as the content of the Compose test rule. This will render the view in the default activity provided by the ComposeTestRule.
The above test generates the following screenshot:
This does not meet our expectations as it only includes the layout and not the entire decorated notification. This is because the notification we received from getActiveNotifications is a “copy of the original Notification object” instead of the actual posted notification. Therefore, we need to rebuild the notification to reflect the actual posted notification.
Fortunately, the Notification.Builder class provides a method called recoverBuilder that converts an existing notification to a builder object. This can be used to rebuild the notification to match how it’s displayed to the end user.
Putting everything together, our final test looks like this:
1
2
3
4
5
6
7
8
9
10
11
12
13
14
15
16
17
18
19
20
21
22
23
24
25
26
@get:Rule
val composeTestRule = createAndroidComposeRule<ComponentActivity>()

@@get:Rule
val roborazziRule = RoborazziRule(
    composeRule = composeTestRule,
    captureRoot = composeTestRule.onRoot()
)

@Test
fun `Generate and Test Notification Screenshot`() {
    val context: Context = ApplicationProvider.getApplicationContext()
    val postedNotification = postAndGetNotification()

    //val remoteViewToTest = postedNotification.notification.bigContentView
    val builder = Notification.Builder.recoverBuilder(
        context,
        postedNotification
    )
    val remoteViewToTest = builder.build().bigContentView
    val view = remoteViewToTest.apply(
        context, FrameLayout(context)
    )

    composeTestRule.setContent { AndroidView(factory = { view }) }
}
Running this, we get our proper notification layout:
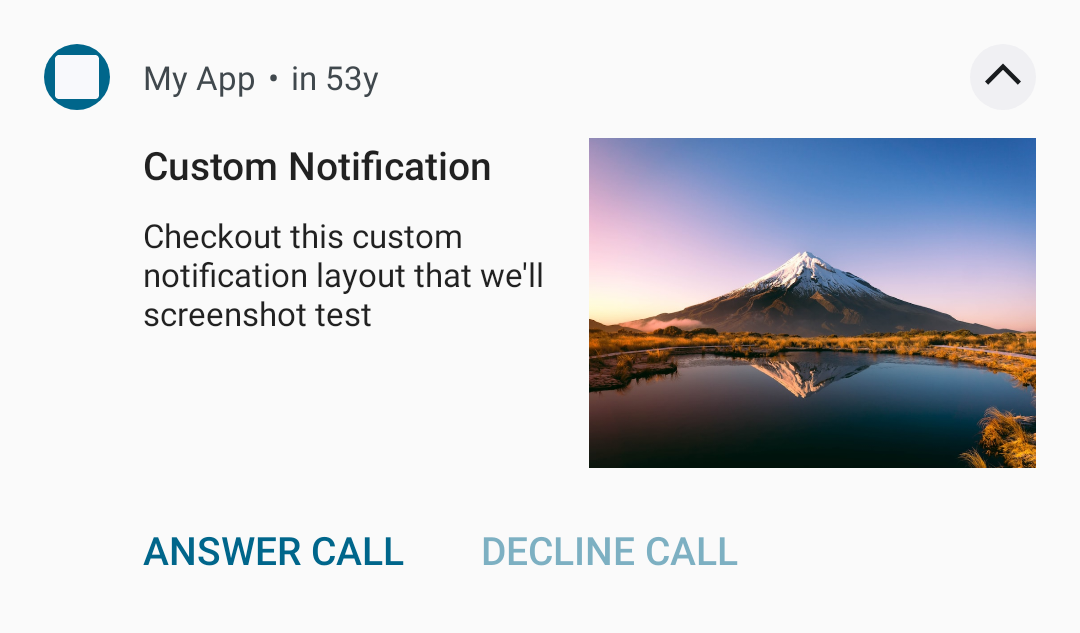
Notification.Builder has other layout types such as contentView, headsUpContentView, etc. that we can be used to test other layouts using the same philosophy. We can couple them with Robolectric’s device config qualifiers to test across OS versions and Dark Mode.
In conclusion, testing notifications can be challenging, especially when working with custom layouts or trying to capture the entire decorated notification. However, by using tools like Roborazzi and the Notification.Builder class, we can streamline the testing process and ensure that our notifications are working as intended across different OS versions and settings.
Thanks to Chris Banes for the review and Mike Nakhimovich for the idea.